Pages

Saturday, October 27, 2018

Fetița cu acuarele / The watercolour girl - crochet doll

As I describe myself lately, I'm a crochet enthousiast training myself to becoming a pattern designer. And how else to begin this journey if not by allowing myself to complete such challenges as creating alike-dolls for young girls? Bellow you can contemplate my first doll, inspired by a pretty dressed girl, whose picture I found randomly in HappyButtonStore on Etsy. 


For the doll body and shoes, I used Tella pattern provided by Knottellaa on her youtube channel and facebook page. I created the dress and beret using my own imagination. Later at some point, I might be able to create a doll body of my own, and then transform this first alike-doll atempt into a pattern for you. It would be so nice, wouldn't it?


As a matter of fact, my objective regarding the creation of personalized dolls is creating opportunities for pattern design. So I hope it won't take long until I will be able to present you my first full doll pattern.
I release this new opportunity that I've created for myself with a contest for my romanian followers - you can find details here.


Technical details: I used Alize Bahar/Catania Originals cotton yarn, with a 2.25 mm Clover Amour hook. For the hair, I used a romanian silk (100% viscose) yarn, that I brushed after installing it on the doll head. I painted the eyes using textile colours on a piece of thin cotton cloth, then I glued them on the face. The pallette is cutout from felt, and the colour drops are crocheted with a 0.75 mm hook using embroidery yarn.
Hope that you like The Watercolour Girl as much as I do! 😍

Later Edit: Aquarella is actually the second doll I created, I almost forgot about the Girl in the Teapot, made for writer Laura, 3 years ago!


Monday, October 22, 2018

Miss Piggy - Free amigurumi pattern

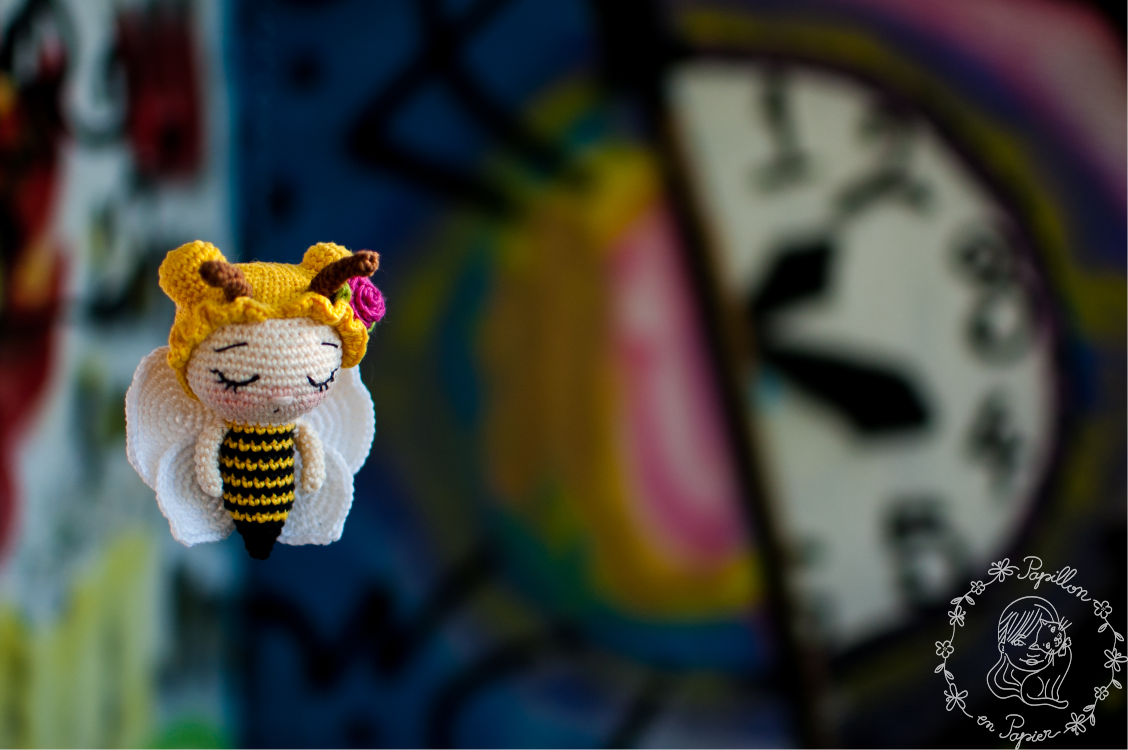
Oh, I've never been more excited about something as I am about Miss Piggy right now! As a matter of fact, I'm writing this post in a very much hurry, just to be able to show you Miss Piggy wearing her sweeeet ruffled dress (which, by the way, was recycled from an old shirt). In the same time, I'm giving you the opportunity to make a Miss Piggy of your own, courtesy of Yana Dym Sky, her designer, which allowed me to publish my english notes describing her pattern.

As I said before, my notes are not as detailed as the original tutorial, so if you want further guidance, please watch Yana in action on her youtube channel - you can find the first part of Miss Piggy video tutorial here.


By clicking right here, you will find a short guidance for the abbreviations I'm using. For this doll, I used Clover Amour hook size 2.25 mm, with Catania/Alize Bahar cotton yarn - tight crochet for the body and loose crochet for the dress. I'm not sure about the size of the eyes, maybe 10 mm, but you can experiment with several sizes and decide what's good for you, depending on the size of your finished toy :)

1. HEAD

R1: magic ring, 6sc
R2: 6inc (12)
R3: 1sc, 1inc (18)
R4: 2sc, 1inc (24)
R5: 3sc, 1inc (30)
R6: 4sc, 1inc (36)
R7: 5sc, 1inc (42)
R8: 6sc, 1inc (48)
R9: 7sc, 1inc (54)
R10-R16 (7rows): 54sc (54)
R17: 9sc, (1sc, 1inc)x6, 1ch, skip 1sc, 10sc, 1ch, skip 1sc, (1inc, 1sc)x6, 9sc (66) (insert later the safety eyes in the holes created by skipping 1sc)
R18-R20 (3 rows): 66sc (66)
R21: (9sc, 1dec)x6 (60)
R22: (8sc, 1dec)x6 (54)
R23: (7sc, 1dec)x6 (48)
R24: (6sc, 1dec)x6 (42)
R25: (5sc, 1dec)x6 (36)
R26: (4sc, 1dec)x6 (30)
R27: (3sc, 1dec)x6 (24)
R28: (2sc, 1dec)x6 (18)
R29: (1sc, 1dec)x6 (12)
R30: 6dec (6)
Fasten off, leave long tail for sewing to the body.

2. EARS (make two)

R1: magic ring, 6sc (6)
R2: 6sc (6)
R3: 6inc (12)
R4: 12sc (12)
R5: (1sc, 1inc)x6 (18)
R6: 18sc (18)
R7: (2sc, 1inc)x6 (24)
R8: 24sc (24)
R9: (3sc, 1inc)x6 (30) R10: 30sc (30)
R11: superpose the final row, crochet together 14sc, leave long end for attaching to head.

3. MUZZLE

R1: magic ring, 6sc (6)
R2: (1sc, 1inc)x6 (12)
R3: 1sc, 3inc, 4sc, 3inc, 1sc (18)
R4: 1sc, (1sc, 1inc)x3, 4sc, (1sc, 1inc)x3, 1sc (24)
R5: 1sc, (2sc, 1inc)x3, 4sc, (2sc, 1inc)x3, 1sc (30)
R6: BLO, 30sc
R7: 30sc
Fasten off, leaving long end for sewing to head.

4. BODY

R1: magic ring, 6sc
R2: 6inc (12)
R3: (1sc, 1inc)x6 (18)
R4: (2sc, 1inc)x6 (24)
R5: (3sc, 1inc)x6 (30)
R6: (4sc, 1inc)x6 (36)
R7: (5sc, 1inc)x6 (42)
R8: (6sc, 1inc)x6 (48)
R9: (7sc, 1inc)x6 (54)
R10-R19 (10 rows): 54 sc
R20: (7sc, 1dec)x6 (48)
R21-R22: 48sc
R23: (6sc, 1dec)x6 (42)
R24-R25: 42sc
R26: (5sc, 1dec)x6 (36)
R27-R28: 36sc
R29: (4sc, 1dec)x6 (30)
R30-R31: 30sc
R32: (3sc, 1dec)x6 (24)
R33-R34: 24sc
R35: (1sc, 1dec)x6 (18)


5. HANDS

R1: magic ring, 6sc
R2: (1sc, 1inc)x3 (9)
R3: 9sc
R4-R5: (join the two parts): 18sc
R6-R10: 18sc
R11: 8sc, 1dec, 8sc (17)
R12: 17sc
R13: 8sc, 1dec, 7sc (16)
R14: 16sc
R15: 8sc, 1dec, 6sc (15)
R16: 15sc
R17: 8sc, 1dec, 5sc (14)
R18: 14sc
R19: 7sc, 1dec, 5sc (13)
R20: 13sc
R21: 7sc, 1dec, 4sc (12)
R22: 7sc, 1dec, 3sc (11)
R23: 6sc, 1dec, 3sc (10)
R24: 6sc, 1dec, 2sc (9)
R25: sc a few stitches to be able to fold it the right way, then stitch together to end, leave long ends for attaching to body.

6. FEET

R1: 7ch
R2: from 2nd ch from hook, 5sc, 6sc in last ch, 5sc (16)
R3: 5sc, 6inc, 5sc (22)
R4: 3sc in first sc, 4sc, (1sc, 1inc)x6, 5sc (30)
R5: 1inc, 1sc, 1inc, 4sc, (2sc, 1inc)x6, 5sc (38)
R6: 1sc, 1inc, 2sc, 1inc, 33sc (40)
R7: 40sc, crocheted from the back
R8: 40sc in top 2 loops
R9-R10: 40sc
R11: 4sc, 1dec, 13sc, 1dec, (1sc, 1dec)x4, 7sc, change color
R12: attach middle back, 13sc, 5dec, 11sc (29)
R13: 11sc, 4dec, 10sc (25)
R14: 1dec, 10sc, 1dec, 11sc (23)
R15: 9sc, 3dec, 8sc (20)
R16-R18: 20sc
R19: 1dec, 18 sc (19)
R20: 19sc
R21: 1dec, 17sc (18)
R22: 18sc
R23: 1dec, 16sc (17)
R24: 17sc
R25: 1dec, 15sc (16)
R26: 16sc
R27: 1dec, 14sc (15)
[left leg]
R28: 11sc, 1dec, 2sc
R29: 10sc, 1dec, 2sc
R30: 9sc, 1dec, 2sc
R31: 6dec, fasten off
[right leg]
R28: 3sc, 1dec, 10sc
R29: 3sc, 1dec, 9 sc
R30: 3sc, 1dec, 8sc
R31: 6dec, fasten off

7. DRESS

The dress I used for my Miss Piggy was just designed by me, so I'm presenting you this version. For the original version, please check Yana's tutorial here.

R1: 32ch, turn, slst into the 6th ch
R2: 2ch (counts as dc), 3dc, [1dc, 1ch, 1dc] into next ch, 2dc, [1dc, 1ch, 1dc] into next ch, 8dc, [1dc, 1ch, 1dc] into next ch, 2dc, [1dc, 1ch, 1dc] into next ch, 6dc, turn
R3: 2ch (counts as dc), 1dc, (2dc in next dc)x2, 2dc, 5ch, skip 8 stitches, 1dc, 2dc in next dc, (2sc, 2dc in next dc)x3, 1dc, 5ch, skip 8 stitches, 2dc, (2dc in next dc)x2, 4dc, turn
R4: 2ch (counts as dc), 2dc, 2dc in next dc, 3dc, 2dc in next dc, 1dc, (1dc in next ch)x2, 2dc in next ch, (1dc in next ch)x2, 2dc, 2dc in next dc, 3dc, 2dc in next dc, 2dc, 2dc in next dc, 3dc, 2dc in next dc, 2 dc, (1dc in next ch)x2, 2dc in next ch, (1dc in next ch)x2, 1dc, 2dc in next dc, 3dc, 2 dc in next dc, 2dc, 6ch, turn,
 R5: sc around

Dress shoulders: working on R3, 4dc in first 1ch space, 2dc, (2dc in next dc)x2, 2 dc, 4dc in 1ch space.

Hope you Miss Piggies will turn out just as cute as mine. Thank you, Yana Dym Sky, for the hard work invested in creating this beautiful pattern!

This article is printer friendly. Search for the print button at the end of the article.

Please make sure you read the first part of the amigurumi tips series - how to read the patterns proposed on this blog, before you proceed to making this toy.

If you want to post photos of what you've created following this pattern, there is a group dedicated to Papillon en Papier artwork - Papillon en Papier Wonderland. Join to keep up with my work.

Monday, December 11, 2017

CAL doll Greta - free crochet pattern, PART 5 - DRESS AND SHOES

Here we've come, my friends, to the final part of Greta doll, an original design of Petus Ochoa, who gave me her approval to translate her video tutorials. This is why I recommend, once again, to watch the original videos, for the dress and for the shoes, in order to see how special stitches are done and how, normally, everything should look like. You'd notice I worked just a bit differently from the videos, but the modifications I made should not change very much the outcome.


DRESS

Cluster1: 1dc, 2ch, 1dc into the same stitch
Cluster2: 2dc, 2ch, 2dc into the same stitch/cluster

R1: 34ch, turn
R2: starting in 7th ch from hook, 3dc, [cluster1, 6dc]x3, cluster1, 3dc, turn
R3: 2ch (counts as first dc), 3dc, [cluster2 in the 2ch space of cluster1, 8dc]x3, cluster2 in the 2ch space of cluster 1, 4dc, turn
R4: 6ch, 5dc, 2dc in last dc before the 2ch, 6ch, skip all stitches until next dc after the 2ch of the next cluster2, works 2dc into same dc, 10dc, 2dc in same dc before the next 2ch, 6ch, skip all stitches until next dc after the 2ch of the next cluster2, works 2dc into same dc, 5dc, turn
R5: (work only sc on this row) 1ch, [2sc, 1V] all along, turn
R6: 6ch, 1dc, [skip one stitch, cluster2, skip one stitch, dc] all along, 1dc final, turn
R7: 2ch, [cluster2 in cluster2, 2dc in the dc] all along, turn
R8: 2ch, [cluster2 in cluster2, 1dc, 1dc increase (3dc in total)] all along, join to the other end of the row and then continue working without turning anymore for the following rounds
R9-R16 (8 rounds): the 2ch you make at the beginning of each round should be in the middle of the bottom edge of the triangle between each column of clusters. The triangle shape is formed by adding a dc between each cluster2 on each round, for example, if you have 3dc between each cluster2 on row 8, you will have 4dc between each cluster2 on row 9, 5dc between each cluster2 on row 10 etc ending with 11dc between each cluster2 on row 16. Make a slip stitch at the end of each row. You can work more than just 16 rows if you want.

The final row, R17, is a decorative edge and consists of sc worked from left to right (for the right-handed): please check Petus video for the dress in order to see how it’s done. After you finish the bottom edge, go back to the arm holes and work around them one row of clusters2 separated by 1dc, then add an edge in the same manner as for the skirt. You should obtain 7 cluster2 on each armhole, but it’s no problem if you obtain one more or one less. Add 3 buttons to the back, a button or other decoration on the chest, and then the dress is ready to go on your doll.


SHOES

SOLES – make two of them, in the same color, and don’t fasten off for the second one, if you’re using the same color for the border, like me.

R1: 9ch, 3sc in second ch from hook, 6sc, 3sc in next ch, 6sc, slst into first sc (12)
R2: 1ch, 3V, 6sc, 3V, 6sc (24)
R3: 1ch, [1sc, 1V]x3, 7sc, 1V, [1sc, 1V]x2, 6sc, slst (30)
R4: 1ch, [2sc, 1V]x3, 8sc, 1V, [2sc, 1V]x2, 6sc , slst (36) Prepare a plastic sole that would fit between the two crochet soles, then align them one over the other, making sure the wrong sides of the crochet soles are inside.
Start closing the three-layer sole with a sc row (R5), passing through both loops, for the upper crochet sole, and through one loop, for the bottom sole. Hide the yarn end when you’ve finished and continue with another color.

R6: On the unworked loops of the bottom sole, cast 36sc starting from the same place where you fastened off on R5, for the left shoe, and 18sc further for the right shoe, slst into the first sc (36)
R7-R9: 36sc, slst (36)
R10: left shoe: 6sc, 1hdc, 6 dc decreases worked together (see Petus video to understand how it’s done), 1sc to secure it, 1hdc, 16sc, slst
right shoe: 18sc, 1hdc, 6 dc decreases worked together, 1sc to secure it, 1hdc, 4sc, slst
both shoes: in order to make the strap, 17ch, then starting from the second ch from the hook, work 1sc in the 3rd loop of each chain (the one in the back) up to the beginning (16sc), then slst into the next stitch. Fasten off.

BOW: in magic ring, 3ch, 4dc, 3c, slst, 3ch, 4dc, 3ch, slst, secure the magic ring and with the free yarn end, cover the middle of the bow a few times. Attach to the strap with glue or using the yarn ends. I added some clips on the shoes and on the straps, in order to make them removable.


My strawberry doll adores them! Thank you all for joining this CAL, and hope to see you again on the next one! :)


This article is printer friendly. Search for the print button at the end of the article.

Please make sure you read the first part of the amigurumi tips series - how to read the patterns proposed on this blog, before you proceed to making this doll.

If you want to post photos of what you've created following this CAL, there is a group dedicated to Papillon en Papier artwork - Papillon en Papier Wonderland. Join to keep up with my work and CALs.

Find the first part of the CAL - the hands, here.

Find the second part of the CAL - the legs, here.

Find the third part of the CAL - the body and head, here.

Find the fourth part of the CAL - the assembly, here.

Thursday, December 7, 2017

CAL doll Greta - free crochet pattern, PART 4 - ASSEMBLY

My life is so busy lately, that I must confess - I cheated other priorities in order to help you finalize your Gretas before Christmas. So, here is my method for joining the parts together.

First step, you need to gather all the parts and tools together, as shown in figure 1. You will need a long needle, some buttons, strands of yarn - body and underwear colors, and pins. In figure 1, left, I highlighted the shape of the doll seen from the side - it has a curve at the back, given by the decreases on rows 19 and 20, and a curve on the face, given by decreases on rows 55 and 56 - those curves represent the bottom and the face.


Second step, you will pin-mark the first and last decrease on row 19, to help you decide next where the joining points will be, as illustrated in figure 2:
- in order to attach the legs, mark 7th and 9th rows on the underwear and 7th row from above on the legs;
- in order to attach the hands, mark 6th row from the neck, on the body, and 5th row from above on the hands.


To realise the joinings, I will explain how I did it for the legs. I passed the yarn through the needle, then I passed the needle through both holes of one button. Then, I inserted the needle into the left leg of the doll, as close as I could to the pin. I removed the pin while I was passing the needle to the other side. Then, I inserted the needle through the marks on the 9th row of the body, from my right to my left. Then, I took the right leg of the doll and passed from right to left, according to the mark. Next, I passed my needle through both holes of the second button, and executed a return to the first button on the opposite side of the doll. On the legs, I had to punch in the same place, but making sure I didn't meet the coming strand of yarn (in order to avoid tangles and allow pulling). On the body, I punched through marks on row 7. At the end of this operation, your legs should look like in figure 3. Then, you will take both yarn ends and pull as tight as you can (you may want to press from the side of the doll) until you obtain some kind of "V shape" for the underwear. In fact, it should look similar to plastic doll joints. Then, fasten off and hide the ends into the left leg.


Do similar for the hands. Then mark the belly and the bottom as pictured in figure 4, on row 15. Take the needle with white yarn , insert it from the bottom to the belly. Come back to the bottom from row 14 near the belly. Then, insert the needle into the magic ring between the legs, and come back once again to the bottom mark. Fasten off and hide the ends.


You may shape further the face as I did in figure 5 - I marked the places where I wanted the eyes and corners of the mouth, and, inserting the needle from the back of the head, I went from the left eye to the left mouth corner, then to the right mouth corner and right eye, going out through the back of the head, the same place where I entered. Pulled, fastened off and hid the ends.


For the small doll, I chose painted eyes on fabric. For the bigger doll, I used safety eyes from Aliexpress.

As I finished to decorate her head, I also present you the half-naked Lumi doll. She is some kind of self-portrait, although she looks more like me without the braids. One of the next days I will post the dress and shoes pattern, as soon as I will make them for my Lumi.


Have fun!


This article is printer friendly. Search for the print button at the end of the article.

Please make sure you read the first part of the amigurumi tips series - how to read the patterns proposed on this blog, before you proceed to making this doll.

If you want to post photos of what you've created following this CAL, there is a group dedicated to Papillon en Papier artwork - Papillon en Papier Wonderland. Join to keep up with my work and CALs.

Find the first part of the CAL - the hands, here.

Find the second part of the CAL - the legs, here.

Find the third part of the CAL - the body and head, here.

Find the fifth part of the CAL - the dress and shoes, here.

Wednesday, November 1, 2017

CAL doll Greta - free crochet pattern, PART 3 - BODY AND HEAD

I've decided to share with you the body and head part of this doll before I work them myself, because I see you are so eager to finish. I will also share during the next days the shoes and dress pattern. However, I will only share tips and technique of assembling the legs and hands to the body only when I will be able to photograph the process properly. Either you can be patient and wait for me, or find your own way to assemble, but keep in mind that my way is not the same way as the designer's way, Petus Ochoa. You may find her two videos for working the body and head here and here

Let's proceed!

Using underwear color,
R1. 6sc in magic ring
R2. 2 sc in each sc (12)
R3. (1sc, 1V)x6 (18)
R4. (2sc, 1V)x6 (24)
R5. (3sc, 1V)x6 (30)
R6. (4sc, 1V)x6 (36)
R7. (5sc, 1V)x6 (42)
R8. (6sc, 1V)x6 (48)
R9. (7sc, 1V)x6 (54)
R10. (8sc, 1V)x6 (60)
R11-R16. 60sc (60)

Change for skin color:
R17. 60sc in BLO (60)
R18. 60sc (60)
R19. 28sc, 1X, (4sc, 1X)x5 (55)
R20. 27sc, 1X, (3sc, 1X)x5 (48)
R21. 48sc (48)
R22. (6sc, 1X)x6 (42)
R23-R30. 42 sc (42)
R31. (5sc, 1X)x6 (36)
R32-R33. 36sc (36)
R34. (4sc, 1X)x6 (30)
R35. 30sc (30)
R36. (3sc, 1X)x6 (24)
R37. (2sc, 1X)x6 (18)
R38. (1sc, 1X)x6 (12)
R39-41. 12sc (12)
R42. (1sc, 1V)x6 (18)
R43. (2sc, 1V)x6 (24)
R44. (3sc, 1V)x6 (30)
R45. (4sc, 1V)x6 (36)
R46. (5sc, 1V)x6 (42)
R47. (6sc, 1V)x6 (48)
R48. (7sc, 1V)x6 (54)
R49. (8sc, 1V)x6 (60)
R50-54. 60sc (60)
R55. work a custom no of sc - until you are ahead the 23 sc on which will be performed the 8 decreseases for shaping the face (for me, it worked first with 13sc, then with 22sc - you might end with a different number. In order to approximate where your decreases will be worked, guide yourself by the SHAPE OF THE BODY you have by now.) - after that, work (1X, 1sc)x4, 1X. Mark the beginning of the next row in the next sc. (You might also want to remember to stick a plastic rod or a wire frame, if you want it to be poseable, inside the body up through the neck and head, before finishing and filling the head).
R56. (1sc, 1x)x3, 46sc (52sc)
R57-61. 52sc (52)
R62. 46sc, (1V, 2sc)x2 (54)
R63. 1V, 2sc, 1V, 51sc (56)
R64. 56sc (56)
R65. 14sc, 1X, 24sc, 1X, 14sc (54)
R66.  (7sc, 1X)x6 (48)
R67. (6sc, 1X)x6 (42)
R68. (5sc, 1X)x6 (36)
R69. (4sc, 1X)x6 (30)
R70. (3sc, 1X)x6 (24)
R71. (2sc, 1X)x6 (18)
R72. (1sc, 1X)x6 (12)
R73. 6X
Fasten off.

You might want to decorate the face and add hair before the assembly. At least, this is how I advise you to do it. First, you might want to shape a little further the head - I use for that the photo tutorial provided by Tiny Miny Design here - but I do the shaping BEFORE attaching or embroidering the eyes and mouth, not after! Then, ou may use painted eyes (find a tutorial for this here) or embroider the eyes (use this very good tutorial, if you don't know yet how to embroider eyes on a doll). 

As for the hair, last time I used wool hair. I attached it only on the extremities of the head, marked priviously with pins, like in the picture bellow.


As usually, if you find any mistakes in the pattern, signalize them in a comment and I will fix it as soon as I can. Have fun!

This article is printer friendly. Search for the print button at the end of the article.

Please make sure you read the first part of the amigurumi tips series - how to read the patterns proposed on this blog, before you proceed to making this doll.

If you want to post photos of what you've created following this CAL, there is a group dedicated to Papillon en Papier artwork - Papillon en Papier Wonderland. Join to keep up with my work and CALs.

Find the first part of the CAL - the hands, here.

Find the second part of the CAL - the legs, here.

Find the fourth part of the CAL - the assembly, here.

Find the fifth part of the CAL - the dress and shoes, here.

Sunday, October 29, 2017

Pikachu girl - free crochet doll pattern

I am very happy to finally present you my Pikachu girl, following a free pattern by Handmade by Mrs Owl, Milena Sova by her real name. She has a youtube channel where she presents her doll patterns and not only - she also shares tips, advises and all sorts of secrets related to crochet and how to design a doll or an amigurumi.

I find her work not only amazing, but also perfect - perfectly designed, perfectly documented and perfectly presented. I couldn't ask for more and, besides, all this knowledge she offers for free! She is filming her tutorials in russian, but she added subtitles in english to all the videos, for a worldwide reach. 

I must admit that, at first, I was circumspect about working my dolls wrong side out. But luckily Milena succeeded to convince me to overcome this aspect, and here it is, my first doll - the Pikachu girl. She was worked with Alize Bahar for body and Catania Originals for clothes and accessory, using a 2 mm Clover Amour hook. She is approximately 32 cm tall and is wearing painted eyes and wool hair. I am so in love with the result! How do you guys find her? :)

Check more photos of Pikachu girl in the facebook post.


Saturday, October 21, 2017

Little honey bee - free amigurumi pattern

Knottellaa is a dollmaker that I admire very much. She even has an exclusive page for sharing her knowledge with the world, Knottellaa Academy. Unfortunately, her master classes are only in arabic...  Even so, I've been quite happy to discover that earlier this year she broadcasted a live video on facebook, featuring the making of "a mistery doll". Which was this very little bee, and I must confess it is really the most wonderful amigurumi I have ever made by now!

I've been struggling almost an entire day to keep up with Knottellaa (because I hardly understand arabic), and meanwhile I took notes, which I share with you bellow. The truth is the world needs more cute little bees like this one :)


I worked with Catania Originals cotton yarn and a 2 mm crochet hook. By the way, I use a Clover  Amour hook and I'm totally in love with it! It's worth all the money!

Body and head

R1. (in black) 6sc in magic ring
R2. 6 sc (6)
R3. 6V (12)
R4-R5. 12 sc (12)
6. (in yellow) (1sc, 1V)x6 (18)
R7-R16. (alternating black&yellow) 18 sc (18)

Fasten off, change for cream/off white.

R17. 18sc (18)
R18. (2sc, 1V)x6 (24)
R19. (3sc, 1V)x6 (30)
R20. (4sc, 1V)x6 (36)
R21. (5sc, 1V)x6 (42)
R22. (6sc, 1V)x6 (48)
R23-29. 48sc (48)
R30. (6sc, 1X)x6 (42)
R31. (5sc, 1X)x6 (36)
R32. (4sc, 1X)x6 (30)
R33. (3sc, 1X)x6 (24)
R34. (2sc, 1X)x6 (18)
R35. (1sc, 1X)x6 (12)
R36. 6X

Fasten off.

Cap (in yellow)

R1. 6sc in magic ring (6)
R2. 6V (12)
R3. (1sc, 1V)x6 (18)
R4. (2sc, 1V)x6 (24)
R5. (3sc, 1V)x6 (30)
R6. (4sc, 1V)x6 (36)
R7. (5sc, 1V)x6 (42)
R8. (6sc, 1V)x6 (48)
R9-R16. 48sc (48)
R17. (4hdc in one sc)x8, 4slst, (4hdc in one sc)x8, fasten off.

Buns (yellow)

R1. 6sc in magic ring (6)
R2. 6V (12)
R3. (1sc, 1V)x6 (18)
R4-R6. 18 sc (18)
Fasten off.

Hands: 6 sc in magic ring, 36 sc around, in spiral.

Antennae: 4 sc in magic ring, (working wrong side up, in spiral), 28 sc.

Small wings

R1. 6sc in magic ring
R2. 6V (12)
R3. (1sc, 1V)x6 (18)
R4. (2sc, 1V)x6 (24)
R5. Left wing – 1 sc, (1V, 3sc)x3, [1hdc, 2dc, 1hdc] in one stitch, (3sc, 1V)x2, 2sc
Right wing - 1 sc, (1V, 3sc)x1, [1hdc, 2dc, 1hdc] in one stitch, (3sc, 1V)x4, 2sc

Big wings

R1. 6sc in magic ring
R2. 6V (12)
R3. (1sc, 1V)x6 (18)
R4. (2sc, 1V)x6 (24)
R5. (3sc, 1V)x6 (30)
R6. (4sc, 1V)x6 (36)
R7. Left wing – 2sc, (1V, 5sc)x3, [1hdc, 2dc, 1hdc] in one stitch, (5sc, 1V)x2, 3sc
Right wing – 2sc, (1V, 5sc)x1, [1hdc, 2dc, 1hdc] in one stitch, (5sc, 1V)x4, 3sc

The rose is also a free pattern, courtesy of Happy Berry Crochet. I used this pattern to embellish also my little snail girl.

I hope you will enjoy making this little adorable Honey Bee! You can publish your creations on the exclusive facebook group, Papillon en Papier Wonderland. And I can't wait to hear your opinion on Little Honey Bee's walk through the park!


This article is printer friendly. Search for the print button at the end of the article.

Please make sure you read the first part of the amigurumi tips series - how to read the patterns proposed on this blog, before you proceed to making this doll.

Sunday, October 15, 2017

CAL Doll Greta - free crochet pattern, PART 2 - LEGS

This article is printer friendly. Search for the print button at the end of the article.

Please make sure you read the first part of the amigurumi tips series - how to read the patterns proposed on this blog, before you proceed to making this doll.

If you want to post photos of what you've created following this CAL, there is a group dedicated to Papillon en Papier artwork - Papillon en Papier Wonderland. Join to keep up with my work and CALs.

I am astonished about how this CAL was received - with so much enthusiasm and excitement! Therefore, I didn't want to delay too much the posting of the second part, so I worked hard to finish my little legs in order to share with you the next stage of this CAL. The hard part is that I work on two dolls at the same time, but I know that eventually this work will pay off and these dolls will become my two wonders!


Let's proceed with the legs!

The video for making these legs is found here.

Unlike Petus, the designer of this doll, I chose to reinforce my doll with copper wire. If you choose to use it too, you should curl the wire at the ends, just like we did with the hands. However, at the closing end, this curvature should be bigger, as illustrated in the picture bellow (g). Also, don't be afraid to use "men" tools, the name by which these pliers would be more familiar to most of you :) I use it to pull easier the needle through the work, when I want to hide yarn ends inside the body or when I embroider the eyes, but also to shape the copper wire.

I added two extra rows and knees to the original legs pattern :)

In "sock" color (white, in my case):

R1. 8ch, start in second chain from hook, 3sc in same ch, (return) 5sc, 3sc in same ch, 5sc (16)
R2. 3V, 5sc, 3V, 5sc (22)
R3. (1sc, 1V)x3, 6 sc, 1V, (1 sc, 1V)x2, 5 sc (28)
R4. (2sc, 1V)x3, 7sc, 1V, (2sc, 1V)x2, 5sc (34)
R5-R7. 34sc (34)

After R7, because I'm planing to make a different shoe model than the original, I inserted plastic soles  (cut to measure) inside the bigger feet (picture (a)), so that the doll will stand by herself even when not wearing shoes. For smaller feet this step is not compulsory, as the original pattern for the shoes (which I will post in the next stage of the call) does include using plastic soles.

R8. 15sc, (1X, 1sc)x5, 1X, 2sc (28)
R9. 4sc, 1X, 1sc, 1X, 6sc, 6X, 1sc (20)
R10. 1X, 8sc, 1X, 2sc, 2X, 2sc (16)

At this stage, you should insert your copper wire and begin stuffing the feet (picture (b), (c), (d)).

R11. 16sc (16)
R12. (3sc, 1V)x4 (20)
R13-R14. 20sc (20)
R15. (4sc, 1V)x4 (24)
Finish off. Keep the yarn end on the outside, if you want to make a crochet border to the sock. At this stage, legs should look like in picture (e).

In skin color:

R16. 24sc in BLO (24)
R17. 24 sc (24)
R18. 6sc, 1V, 2sc, 1V, 14sc (26)
R19-22. 26sc (26)
R23. 7sc, 1X, (1sc, 1X)x2, 7sc, 3V, 1sc (26)
R24. 26sc (26)
R25. 7sc, 1V, (1sc, 1V)x2, 7sc, 3X, 1sc (26)
R26. 26sc (26)
R27. 11sc, 1V, 14sc (27)
R28. 27sc (27)
R29. 12sc, 1V, 14sc (28)
R30-R36. 28sc (28)
R37. 7sc, 1X, (4sc, 1X)x2, 7sc (25)
R38. (3sc, 1X)x5 (20)
R39. (2sc, 1X)x5 (15)
R40. (1sc, 1X)x5 (10)
R41. 5X
Finish off. Hide the yarn end inside the body.

Sock edge: Using the yarn end left outside after finishing the sock, work in front loops of R16 around the leg - 2sc, (3ch, 2sc)x11, 3ch. Cut yarn and finish off.

Bellow there are some photos I took during the legs making process.


This is your finished little leg. Should I remind you how the finished doll, following this pattern, is likely to look at the end? :)


Find the first part of the CAL - the hands, here.

Find the third part of the CAL - the body and head, here

Find the fourth part of the CAL - the assembly, here.

Find the fifth part of the CAL - the dress and shoes, here.

Friday, October 13, 2017

Amigurumi tips part 3 - dolls hair and eyes

This article is printer friendly. Search for the print button at the end of the article.

There's a wide variety of solutions that you can adopt for you crochet dolls. From accessories to their appearance and clothes, they can be personalized beyond imagination, however you must know that choosing the right hair and eyes type is just a matter of personal choice and it's also part of the game. Yes, I look at doll making art with child eyes. How I wish now I knew about this art when I was a child! But I have now the chance to return to those feelings by making crochet dolls. I just fell in love with them and can't help myself but trying as many patterns and solutions as I can! And slowly, coming out with my own doll models...

Today I'm going to talk about different types of hair and eyes that I've been experimenting with in my dolls, and also about future perspectives.

1. HAIR

What I tried so far is:
  • viscose hair (artificial silk), attached strand by strand to a crocheted cap - it was very time and energy consuming, so not planning to retry this version, however I have documented the process in the photos bellow.
  • crocheted wig - I used it in Alexa doll, tutorial by Petus Ochoa and notes by me. But there are a bunch of variants that could be tried, and I find some of them very nice looking too. I would opt for this version of wig particularly if I was to make a doll meant for a baby - it will maintain its shape / style in time better than any other version.
  • wool hair - I bought some wool yarn, not very homogenous, though (it contains some very thin parts across the lenght, which I tried to place away from the surface of the head) - I used it in Alesia and Laura dolls (Greta CAL model). I only attached the strands around the head, then secured them in a bun. I also took some pictures of the procedure - firstly, I marked the line where I wanted to plant the hair around the hair using some pins, then I started to attach the yarn.

What I plan to try:
  • I have bought some artificial doll wig hair, which is sold by meter, in different lengths of hair, straight or curly - they are attached to the doll head in spiral around the head by sewing or gluing, directly to the head or using a detachable cap (which can be, in turn, a textile mesh or a soft plastic / glue hardened piece of elastic cloth or mesh). You can find a tutorial about this attaching procedure here.
  • I also have found artificial hair accessories in regular stores, such as hair extensions and elastic bands which contain strands of artificial hair attached to textile cords, similar to the wig hairs specified above.
  • I plan on making some yarn wigs, which are often used for Barbie-sized plastic dolls. For this procedure, it is generally used acrylic yarn, but as far as I understand, it would not allow you to obtain longer than about 10 cm wefts. For longer wefts, I think I will return to viscose, even if it's heavier. Bellow this paragraph you have some youtube references for obtaining yarn wefts for doll hair.
  • alpaca hair - well, this might be a little too expensive for my budget...
  • felting wool hair - I already bought some strands of such wool, but I find it quite fragile, so if you too plan to use this kind of hair, you should know that it can easily break if pulling just a little. But the styling you can obtain is amazing, and, for instance, Alyona Dudakova makes an amazing job on her elves. 
  • simply yarn hair.
  • of course, there are also already made hair wigs on the internet, but they come in specific sizes at enormous costs :)
  • ribbon hair: I found some tutorials herehere and here.
There are various artists proposing tutorials for yarn wefts and, subsequently, doll wigs. Here are just a few:

2. EYES

I've tried by far four types of eyes: 
  • safety eyes: these are standard hemispheres, with a safety joint at the back. These are the type of eyes used in regular plush toys, very safe for small children. There are clear versions of safety eyes, which you can customize using ceramic or nail paint. The only inconvenience is that you have to plant the eyes during crocheting, in order to attach the safety pin on the inside of your work. These eyes appearance can be improved by adding a layer of felt underneath, like I did with my first doll, using Tini Miny Design toturial.
  • embroidered eyes: from my experience, this works best on unmercerized and unsilky cotton. For instance, my favourite yarns for doll body are Catania Originals and Alize Bahar yarns, but these are not appropriate for embroidered eyes. The technique works fine, perhaps, with acrylic yarn too, but since I don't use acrylic, I couldn't say. Also, I find using a curled needle compulsory for embroidering the eyes.
  • painted eyes: this requires painting the eyes on a piece of cotton fabric, then securing the painting with one or two layers of varnish (or you can use nail polish). However, if you are using fabric paint, I don't think the varnishing step is compulsory. The other option I tried is acrylic paint, and it worked marvelously.
  • custom made eyes: I found some thin plastic boards in the hobby store, from which I detached, using a puncher, small circles. I subsequently painted these pieces with ceramic black paint, but nail paint would work just as well. In the end, I just glued them to the toy.
Planes pattern by Marika

There are, however, other ways to obtain custom eyes, so I also plan to try sculpting them with Fimo or another type of clay, for instance.

In the end, I have three questions for you:

1. What is your favourite type of doll hair?
2. What is your favourite type of doll eyes?
3. Which of the techniques presented have you already tried?

If you have information about other types of doll hair and eyes that could be used, please share your knowledge with us. Your welcome!

Check the other parts of Amigurumi tips series:

Part 1 - Reading and understanding crochet instructions proposed by Papillon en Papier

Part 2 - Check the yarn, choose the hook, tension and stuffing